


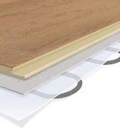
| Depending on whether it's a 15mm or an 20mm floor, Staki pre-finished multi-layered flooring is made up of either a 4mm or a 6mm wear layer of wood bonded on to a core of softwood layers, all laid at right-angles to the each other to counteract the natural movement of the wood in each layer, and resulting in an extremely stable product. |
| During the sanding process and before the lacquered or oiled finish is applied, each edge on a board is machined to form either a tongue or a groove. Using a PVA adhesive, the tongues and grooves on adjacent boards are then glued together during the installation process to form the finished floor. |
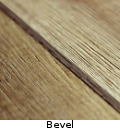
Edges | A minor but subtle feature is the edge style of the board which has a real impact on the overall look of a finished floor. The two main styles are micro-bevelled and square-edged. A bevel edge is applied during the manufacturing process, usually to 1-strip 'plank' boards, to give a more traditional look which helps to define a board. A square edge is applied to 2-strip and 3-strip boards to give a seamless look across a floor.
|
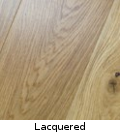
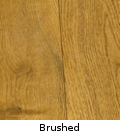
Finishes | Finish options include lacquered, matt lacquered, brushed & matt lacquered, oiled, and brushed & oiled, all of which are applied during the manufacturing process so that all Staki floors come pre-finished meaning that there's nothing else to do once the floor's installed. Special acrylic lacquers without solvents or formaldehyde are used in the manufacturing process for lacquered and matt lacquered floors. Five coats of lacquer are applied to the upper layer, each one hardened by UV radiation before the next one is applied. This process makes the surface hard as well as scratch-resistant whilst at the same time retaining the individual character of the wood itself. Oil is applied to the top surface of the floor during the manufacturing process of an oiled floor and is allowed to dry either naturally or by UV radiation. An oil coating brings out the beauty of the wood and retains the natural feel of the grain whilst at the same time providing a really effective protection for years to come. Oils can also be coloured to create different shades for different tones and moods in an installation. A brushed surface undergoes another stage during manufacture where the top surface is brushed to accentuate the natural grain and texture of the wood.
|
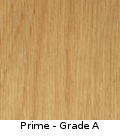
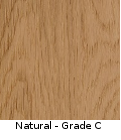
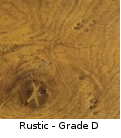
Grades | The grade of a hardwood is set when the logs are selected. The timber is grouped according to the number and nature of features such as knots, splits, grain and colour. Choices range from Grade A to Grade E, or a mixture of grades, which provides a wide range of character options in convenient groupings. The grading is purely an aesthetic guide since no one type has a technical advantage over another. It simply helps in the choice of the look and character of a floor.
|
| Underfloor heating has become incredibly popular in recent years, providing a comfortable, cost-effective and invisible form of heating. Providing the installation guidelines are carefully followed, engineered wood floors and underfloor heating can work very successfully together. Once the system has been installed, the temperature should not exceed 27°C in any area - between 20° and 22°C is ideal. |


Your Staki floor is really simple to install!
A bit of planning, a bit of care and your floor will look as though it's been laid by a professional!
First of all
1. Take up your old carpet or carpet tiles. Do not lay your new floor on a carpet or any other kind of soft floor covering. If your existing floor covering is linoleum, pvc tiles, ceramic tiles or any other kind of hard floor covering, then you can lay your new floor on top providing the surface of your existing floor covering is not damaged in any way.
2. If you're replacing the skirting boards, remove those as well.
Before you do anything else
1. Make sure your sub-floor is clean. Brush or vacuum up anything that will prevent your new floor from lying flat on your sub-floor.
2. Make sure your sub-floor is flat. Get a two metre straight edge, lay it across the floor and if there is more than a 2mm gap between the straight edge and the sub-floor, you will need to rectify this before laying your new floor.
3. If your sub-floor is concrete and it's just been laid, make sure the room's properly ventilated and allow it to dry out for at least a week for each 10mm of concrete up to 40mm, and for at least two weeks for each 10mm of concrete over 40mm. With concrete screeds the residual moisture content of the sub-floor should not exceed 75% rh when using a hygrometer.
4. If you have underfloor heating, make sure that the heating-up phase has been properly carried out before laying your new floor. Under no circumstances lay your floor if the surface temperature of the concrete sub-floor exceeds 27°C.
5. If your sub-floor is wood, make sure
(a) that any loose boards are nailed down properly and no nail heads are protruding
(b) that the moisture content of the wood does not exceed 10%
(c) that any cavity underneath the sub-floor is properly ventilated
6. Bring your new floor into the room where you're going to install it. Leave the floor in the packs for at least 24 hours and don't open them until you're ready to lay the floor. The ideal environment for laying a floor is a temperature of 18°C and relative humidity of 45 - 60%.
Under-floor heating
Staki floors may be laid over under-floor heating but you must ensure that the following guidelines are adhered to:
(1) Electric under-floor heating systems are able to supply an almost instantaneous heat to the floor which warms up the floor over a very short space of time and can cause tensions within the floor. You can however lay a Staki floor over electric under-floor heating providing that
(a) the maximum temperature of the heating system does not exceed 27°C at the point of contact with the floor
(b) the maximum temperature is reached in gradual stages by gentle increments over a period of time - correspondingly if the under-floor heating system is to be switched off, the minimum temperature should be reached in gradual stages by gentle increments over a period of time
(c) the cable carrying the heat is protected from direct contact with the floor
(d) the under-floor heating system is operating at all times thereby avoiding any dramatic increases or decreases in temperature which in turn will limit the amount of expansion and contraction that may take place
(2) With hot water pipe under-floor heating systems, the sub-floor slab should be activated to normal living temperatures for a minimum of 21 days and the maximum temperature maintained for at least a week. The temperature should then be reduced by 5°C per day until the sub-floor temperature is between 16°C and 18°C at which point the floor can be installed. After installation, the temperature of 16°C and 18°C should be maintained for 3 - 4 days before it is gradually increased over a further 3 - 4 days to the recommended sub-floor surface temperature.
Tools
One of our installation kits is a great help when it comes to laying your floor.You get some 10mm plastic packers which give you the correct gap around the edge of the floor whilst at the same time keeping the floor in position while it's being laid. Once you finished laying the floor though, make sure you remove these packers.
You also get a plastic knocking block which you should use with a hammer to tap the boards tight up to each other.
Finally you also get a pull-bar which is used to pull the last board in a row as well as the boards in the last row in the room tight into each other. Obviously you can't use the knocking block in these instances so you hook the lip of the pull-bar over the edge of the floor and use the hammer on the other end of the pull-bar to pull the floor in tight.
Apart from the 'specialist' tools in the installation kit, you will also need a hammer, a saw (either a fine-tooth handsaw or a jigsaw or a cross-cut saw), a set square, and a tape measure and pencil. A useful tip is to use a downward-cutting blade on a jigsaw.
Underlays
All the underlays available with this floor are shown in Related Products below
You should make sure that wherever a damp-proof membrane is used under the floor that the edges of the DPM go up the wall to be hidden behind the skirting boards once they are fitted.

The Barrier Standard 3mm foam underlay is a 3mm polyethylene foam underlay with excellent sound insulation properties. It absorbs minor floor imperfections and is suitable for underfloor heating. It's lightweight and simple to install. Bear in mind that to comply with the manufacturer's warranty you will need to use a separate damp-proof membrane wherever the sub-floor is concrete.
The Barrier Plus 3mm foam underlay is a 3mm polyethylene foam underlay with a built-in vapour barrier with an overlap for joint sealing protection, and excellent sound reduction properties. As with the Barrier Standard underlay, it absorbs minor floor imperfections and it's simple to install. Although it can be laid over underfloor heating, it may reduce the efficiency of the heating system and therefore the Quicktherm Vapour underlay which has been specifically developed for use with underfloor heating systems, should be used instead.
The Duralay Timbermate Excel underlay is a 3.6mm high-density sponge rubber underlay with an integrated vapour barrier. It has substantial sound reduction properties (23dB) and is a high-density foam rubber for enhanced compressive resistance. It absorbs minor floor imperfections and it's suitable for underfloor heating.
The Quicktherm underlay is a 1.8mm perforated polyfoam underlay specifically developed to provide maximum heat transfer when used with underfloor heating systems. It provides excellent footfall noise reduction and impact sound insulation of 19dB.
The Fine Floor Fibreboard underlay is a 5.5mm thick fibreboard panel (590mm x 850mm) which is loose-laid across the sub-floor. It considerably reduces noise in rooms and it limits heat-loss through the floor. It's also a natural product and easy to install. Bear in mind that to comply with the manufacturer's warranty you will need to use a separate damp-proof membrane wherever the sub-floor is concrete.
Expansion and contraction
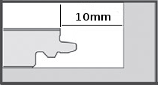
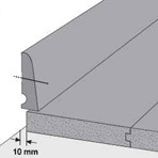
Wood will move depending on ambient temperature and humidity so you must allow for any expansion and contraction to take place otherwise you will find the floor lifting up in the most unlikely places. You make this allowance by leaving a 10mm gap around the edge of the floor and the 10mm plastic packers in the installation kit are ideal for this. Don't forget to allow 10mm around every edge of the floor - for instance, around radiator pipes and at doorways amongst others. Don't worry about this 10mm gap being visible when you've laid the floor - we'll deal with finishing off the floor later.
A guide for this allowance for expansion and contraction is 1mm per metre of flooring on each edge of the floor so be careful if your floor is greater than 10 metres in any one direction. Watch out also if you're running a floor through a doorway into another room without a break and the combined length of flooring in the two rooms exceeds 10 metres. In these situations you can either increase the 10mm allowance - for example, if your expanse of floor is 14 metres long, allow for a 14mm gap on both sides of the room - or put in an expansion profile somewhere, for instance across a doorway.
The tongue-and-groove joint
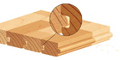
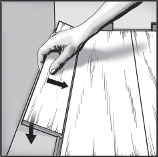
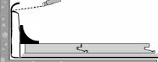
| Apply the PVA adhesive all the way along the top edge of the groove as shown and then tap the boards gently together. The adhesive gets chopped in half when the tongue of the adjoining board is pushed into the groove - one half goes to the back of the groove to form a bond and the other half gets pushed upwards to bond the top layers together. You should get a small bead of adhesive coming up out of the joint. Give this a few minutes to go off and then using a paint scraper to remove it in one long piece. |
Here are a couple of tips.......
Firstly, get a couple of offcuts and put them together without any adhesive at all. You should have an absolutely perfect joint. Have a good look at it because that's the sort of joint you want when you glue the boards together. Take the boards apart and this time use the adhesive in the joint as described above. You should get a small bead of adhesive coming out of the top when you push the two boards together. If you don't get any adhesive coming out, then you haven't put enough adhesive in the joint. Correspondingly, if you can't push the boards together, then you've put too much adhesive in the joint.
Secondly, let the adhesive go off and then remove with a paint scraper and if the joint's exactly the same as it was without the adhesive, then it's perfect.
DON'T wipe the bead of adhesive off the top of the boards with a cloth. It'll leave horrible smear marks on top of the floor which are very difficult to get rid of, so let the glue go off and then remove it with a paint scraper.
Laying the floor
These instructions are for laying your floor as a floating floor. You should note that the Staki warranty does not cover floors which are laid as floating floors. Their floors should be fully bonded to the subfloor to comply with their warranty.
Although in theory you can start laying your floor wherever you want, it's best to start in the left-hand corner of the room and work from left to right across the room. Doorways and radiator pipes can present a bit of a problem so give some thought as to how you're going to cope with them before you start laying the floor.
Roll out the underlay and don't forget to use a separate damp-proof membrane on a concrete sub-floor if there isn't already one built into it.
Unlike a click joint floor, you should lay the groove side of the floor up against the back wall and put the plastic packers between the groove and the wall to get the right gap for expansion/contraction. Usually the tongue on the header joint of the first board will be up against the side wall and since the tongue is proud of the top surface by 4mm, you need to make sure that the skirting or beading you're using around the edge of the room more than covers the overall gap of 14mm (4mm tongue + 10mm packer). If it doesn't, shave off the tongue which will just leave you with the 10mm gap formed by the plastic packers.

Lay the first two rows without any glue in the joints - you'll see why in a moment.
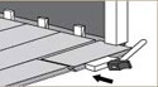
When you get to the end of the row, you've got two options. The simplest way is to measure the distance between the edge of the last board you've laid and the wall; deduct 10mm for the expansion/contraction gap; and then simply cut the board to length.
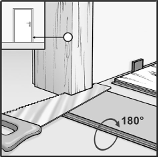
Alternatively, turn the board you're going to cut to length the wrong way round, keeping the decorative surface uppermost, and lay it up against the leading edge of the last board you've laid as shown in the diagram.
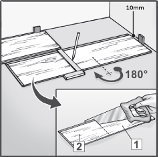
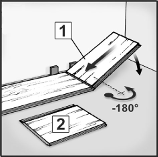
Place the board tight up against the right-hand wall and insert a 10mm plastic packer so you get the correct expansion/contraction gap. You'll have a tongue there but do NOT cut it off because after you've cut the board to size, you're going to turn it round and you'll need the tongue to locate into the groove of the previous board. However, you must still allow for the 10mm gap so sit the packers on top of the tongue and you'll get the right gap.
Using a set square, draw a line across the board in line with the leading edge of the previous board (as shown in the diagram above), cut the board to size and put it in place using the pull-bar if necessary.
Take the offcut from the end of the first row and unless it's a ridiculously short length, use it to start the next row, not forgetting to put a 10mm plastic packer between it and the left-hand wall.
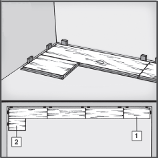
Lay the first two rows without using any adhesive. It's most important at this stage that you have all the joints tightly closed up AND that the leading edge of the second row is dead-straight. If it's not absolutely straight, do not continue until you know the reason why. The most likely reason is that the back wall you've worked off is not absolutely true in which case you should adjust the packers. If the wall is badly out, you should scribe the rear edge of the boards to match the contours of the wall.
Once you're happy with the way the floor's going together, take it up and then put it back again but this time using a PVA adhesive. Use the knocking block or the pull-bar to make sure the boards are as tight up to each other as possible. Don't forget to allow the adhesive to go off before removing it with a paint scraper. Do NOT try and wipe it off! After you've laid the first two rows and you've checked the tightness of the joints AND the straightness of the leading edge of the second row, go off and have a cup of tea, giving the glue time to go off before you carry on laying the rest of the floor. This is just to give you a firmer floor to carry on working from.
From now on, apply the PVA adhesive to each board as and when required and tap the boards gently but firmly into place using the knocking block or pull-bar until you get to the last row.
The last row
When you get to the last row, you will almost certainly have to cut the boards lengthways to get them to fit between the wall and the floor you've already laid. The simplest way to do this is to measure the gap, deduct 10mm for expansion and contraction and cut the board to size. You'll be surprised how often the walls of a room are slightly out so take the measurement at both ends of the board and in the middle as well if necessary.
The last row can be a bit fiddly to fit and this is where the pull-bar is really useful so use it on the side and the header joints wherever necessary.
Doorways
Doorways take a little bit of thought, especially if you're running the floor through from one room to another without a break, but providing you plan ahead, they shouldn't be that much trouble.
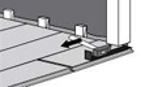
Before you start laying the floor, or at the very latest before you get too close to a doorway, get an offcut of the floor and the underlay, put them up against the door jamb and then use a handsaw to undercut any architraves and door linings as shown in the diagram below. Clear out any debris so the floor can move freely under the door frame once it's installed. Also check to make sure the floor with the underlay underneath can move freely under the door itself and if necessary undercut the door as well.
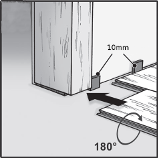
If you are planning to run the floor through the door without a break, you will need to cut the door linings and the architraves all the way through. If however you're stopping the floor at the doorway, just cut the linings as far as you're taking the floor.
You should end up with a gap at the bottom of the door jamb which allows you to slide both the floor and the underlay underneath, AND which at the same time gives you the 10mm expansion and contraction gap, now hidden underneath the door lining.
Cut the boards to shape when you reach the doorway, not forgetting the 10mm expansion/contraction gap, so they fit under the door jamb. Use the pull-bar and knocking block to pull the boards tight to each other.
Use one of our threshold sections shown in Related products below, wherever the floor butts up to a different floor covering and don't forget to allow for the 10mm expansion/contraction gap.
Radiator pipes
Have a look at the installation tab on the radiator pipe covers page for tips on cutting the floor around radiator pipes and fitting the covers.
Finishing off
Once you've finished laying the floor, make sure you remove all the 10mm plastic packers.
If you removed your skirting boards at the outset and you're either refitting them or replacing them with new ones, make sure that the thickness of the skirting being fitted is at least 12mm. Any less than that and the 10mm expansion and contraction gap may become visible should the floor move for some reason.
Where the existing skirting boards have been left in place and you've allowed the 10mm expansion and contraction gap between the skirting and the floor, you will need to use a beading to cover the gap.
Have a look at the installation tab on the scotia beading page for tips on fitting it.
Do NOT under any circumstances pin or glue any beading or skirting to the floor. The floor must be allowed to move freely under the skirting or beading at all times.
Your Staki floor is really easy to look after!
A bit of care and it will look good for years!
Looking after your floor
You should always remember that wood is a natural product and its looks will improve as the floor matures, so you may notice a slight darkening of the floor after a period of time. Don't worry, this is entirely natural and is caused by the effect of sunlight on the floor. If you've got some rugs on the floor, try and move them around so you don't end up with slightly lighter patches where the rugs have been.
Do's
Your floor's biggest enemy is grit and the smaller the grit, the worse it is. The first thing you must do therefore is to put an entrance mat inside every external door to encourage people to wipe their feet, and hopefully that will prevent any problems from arising. If possible, have one outside as well and also, don't forget to clean your mats every so often.
Use felt pads under furniture legs to stop any unforeseen scratching and put castor cups under the castors on chairs and sofas. Always lift heavy furniture when you're moving it around the room.
Clean your floor regularly. Use a brush or vacuum cleaner to get all the loose dirt off the floor whenever needed. If necessary, use a very slightly damp cloth or mop but don't use too much water and always make sure your floor is wiped dry afterwards. Smear marks can be extremely difficult to get rid of.
Wipe up any spilled liquids as soon as possible.
Keep the ambient temperature to 18 - 20°C whenever possible.
Don't's
Don't leave water or any other liquid lying around on your floor for any length of time.
Don''t use a wet mop to clean your floor. Just use a very slightly damp mop.
Don't use an abrasive cleaner. This will damage the finish of your floor.
Don't let sharp or abrasive objects come into contact with your floor.
Don't slide heavy furniture across your floor.
Don't wear stilettos, especially ones with worn heels.
Repairing your floor
Small nicks and scratches can be repaired using a colour-matched filler but larger areas may mean that some boards need replacing. You can do this by replacing a damaged board without having to take up any of the surrounding floor. It sounds difficult but in fact it's relatively straightforward. Give us a ring on 01782 791401 and we'll talk you through it.
General:
All Staki floors are guaranteed from the date of delivery for the period and under the conditions warranted by ourselves. If any goods are found to be defective during the guarantee period and providing such defects have not occurred through incorrect installation, usage or maintenance procedures, or through the liability of other products or persons, we will at our discretion either rectify or replace the defective part of the goods or refund a corresponding proportion of the original price in accordance with the manufacturer's warranty. All goods should be carefully checked for any visible defects both before and during installation. Any goods which are installed in spite of such defects are not covered by the guarantee. Under no circumstances shall we be liable for any consequential loss whatsoever in the event of any claim arising under a guarantee.
The terms of the Staki warranty are as follows:
Installation warranty:
Staki floors are guaranteed for the period set out in the specification tab for each individual floor. They are guaranteed for all residential installations to be free from defects caused as a direct result of faulty manufacture providing the floor is installed in accordance with the manufacturer's installation instructions, a copy of which can be found in each pack of flooring. A commercial use warranty is also available dependent on the use to which the floor is to be put. Please use the Contact Us form to provide details of the installation and a warranty will then be issued.
Visual appearance warranty:
Staki floors are carefully inspected by quality control personnel before leaving the factory. However, flooring should be carefully examined by the customer and the installer for any defects prior to installation. In the unlikely event of a defective board being found, it will be replaced free of charge. In the event that a defective board is installed whether inadvertently or deliberately, no warranty shall apply.
Structural warranty:
All Staki flooring is manufactured using a sophisticated bonding system with each board being produced under intense heat and pressure to ensure the highest level of quality. In the unlikely event of any structural failure of a board within one year of the installation of the floor, we will at our discretion either repair or replace the defective board free of charge. If failure occurs more than one year after installation but before the end of the warranty period, the liability under this warranty will decrease by 10% of the invoice value each year and will be limited to the repair replacement or refund (at our discretion) to the decreased value for that year.
Moisture protection warranty:
Staki floors are specifically designed to withstand the effects of normal moisture or dryness. They are built with a cross-layered base making them extremely stable. Staki residential floors are therefore significantly more resistant to expansion and contraction than traditional solid hardwood floors. Provided they are installed and maintained in accordance with Staki installation and maintenance instructions, Staki floors are guaranteed against damage caused by normal moisture and arid conditions. Should any floor fail under normal moisture conditions during the warranty period, we will at our discretion repair or replace the damaged flooring but we shall not be liable for any costs of finishing.
Exclusions:
The warranties described above will not apply and we will not in anyway be liable in the event of:
- Improper installation - Performance of the floor is highly dependent upon proper installation. Installation must therefore be in strict accordance with the Staki installation instructions.
Please note that Staki do NOT offer a warranty on their floors if they are laid as floating floors. Staki floors must be fully bonded to the subfloor. - Improper maintenance - Maintenance must be in strict accordance with Staki maintenance instructions.
- Abnormal environmental conditions - Staki flooring products are guaranteed to perform in what we consider to be normal residential applications. Any exposure to excessive heat or moisture may cause damage to the flooring and is not covered by this warranty regardless of cause or source. Electric under-floor heating systems are able to supply an almost instantaneous heat to the floor which warms up the floor over a very short space of time. This can cause tensions within the floor and may cause the wood surface to split. We cannot therefore guarantee a Staki floor which is laid over electric under-floor heating. Any damage caused by environmental conditions outside the tolerances specified in the Staki installation instructions is excluded from any or all of this warranty. Please note that Staki flooring is not suitable for use in bathrooms, conservatories, or areas of high humidity.
- Misuse - No responsibility will be accepted for any damage caused directly or indirectly through misuse, abuse, accident or use that is not consistent with the Staki installation instructions. No guarantee either express or implied is given for any damage due to inadequate care or other causes including without limitation, stains, damage caused by worn or narrow-heeled shoes, by the movement of furniture or equipment, by heavy items, by impact, by scratches or scarring caused by pets or other animals, by abrasive or sharp-pointed items, by extreme heat or from moisture caused by wet mopping, spills or standing water.
- Alterations or repairs - Alterations and unauthorised repairs to any Staki flooring will void any and all express or implied warranties including merchantability or fitness for purpose. Any authorised repairs will not extend the guarantee period.
- Reinstallation - In the event that we replace defective boards, we shall not be liable to provide for or incur the costs of removing or reinstalling the defective floor or resurfacing or refinishing the replaced or surrounding floor or to provide for the cost thereof unless and to the extent expressly provided in the warranty description above. No liability to replace or repair shall extend to any sub-floor materials or any other items used in the course of removal, installation or refinishing.
- Normal variances - Wood is a natural and living product. Variations in colour, grain and texture may occur and are not therefore defects and as such no warranty shall apply thereto. Installed flooring will change colour over time and as this is a natural characteristic of wood products, no warranty shall apply. Exposure of all or parts of the installed flooring to direct sunlight may cause variations in colour and such variations are not covered by this warranty
This warranty is not transferable and is extended only to the original purchaser and for the original installation. All warranties shall expire on sale, transfer or relocation of all or any part of the installed floor.
Liability limitations:
The above warranty is the only warranty either express or implied provided by ourselves for residential applications involving light to normal traffic conditions. A commercial use warranty is also available dependent on the use to which the floor is to be put. Please use the Contact Us form to provide details of the installation and a warranty will then be issued. Except as stated herein no other warranty, express or implied, is provided including any warranty of fitness for a particular purpose. No retailer, installer, dealer, distributor, agent or employee has authority to increase the scope or alter the terms or the coverage of this warranty. No agreement to repair or replace shall in any event act to extend the period of coverage of any warranty provided. In no event shall we be liable for any claim loss or damage arising from the purchase, use or the inability to use its products or from any form of special, indirect, incidental, or consequential damages including, without limitation, lost profits, emotional, multiple, punitive or exemplary damages, or legal fees. In no event shall we be liable for the costs of old or new materials other than Staki floors. In no event shall our liability exceed the amount we actually received for the sale of the defective materials concerned. Any claim under the terms of this warranty must be made within seven days of the date on which the defects first became known or first should have been discovered. All claims must be in writing and in order to make a claim under this warranty, evidence of the purchase date and the identity of the original purchaser and installation location must be provided. Without such proof, no warranty shall apply.
This floor will shortly be discontinued. Please check stock before ordering.
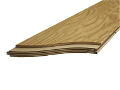
An amazing light oak multi-layered floor with an oiled finish, that simply oozes class. Your home will love it!
Add a touch of sophistication to your home with this amazing light oak floor. Bevelled edges on the two longitudinal sides accentuate the plank appearance and the white oiled finish enhances the natural variations of the oak surface. Add in the modern advantages of stability and suitability for a range of sub-floors as well as being fine with underfloor heating and you've got a floor for just about any interior. The boards can be laid as a floating floor or they can be fully bonded to your sub-floor or they can be secret-nailed. Whichever way you choose, the boards are cleverly engineered to provide strength and stability with each of its nine layers of wood laid at right angles to each other, its profiled tongue-and-groove edges are simply glued together to create the perfect floor every time, just like a professional would!
N.B. This floor is also available as a 15mm x 180mm x 2400mm multi-layered floor - further details of this floor can be found here.
Key features:
- Get in touch for a price - please phone or contact us for a quotation
- 20mm x 220mm x 2400mm boards
- 6mm wear layer
- 4 boards per pack (may include 2 halves) = 2.11 square metres per pack
- White LED-oiled finish
- Two-sided V-groove bevelled edges
- Suitable for general domestic and commercial use
- 12 year guarantee for residential use
- Commercial warranty available - contact us for details
- Really easy to install - the boards can either be glued together as a floating floor, or stuck down, or secret-nailed
- Can be used as a load-bearing floor on joists
- So easy to maintain
- Suitable for under-floor heating
- See below for all accessories available with this floor
| Board specification | |
| Tongue and groove joint | Yes |
| V-shaped bevelled edge on two sides | Yes |
| Surface | White LED-oiled oak |
| Wear layer | 6mm |
| Grade | The grade of this floor is Rustic. Knots and sapwood are allowed. |
| Construction | 1-strip/12-ply - 6mm wear layer + 11 layers plywood |
| Coreboard | Birch ply |
| Board size | |
| Board size | 2400mm x 220mm |
| Board thickness | 20mm |
| Pack size | |
| Boards per pack | 4 no (may include 2 halves) |
| Area per pack | 2.11 square metres |
| Installation | |
| Floating floor | Yes, although it can be secret-nailed or stuck down if required |
| Load-bearing floor | Yes |
| Underlay required | Yes, if the floor is floated. |
| Finishing items | |
| Matching 2400mm x 18mm x 18mm scotia beading | Yes - available in either a standard lacquered finish or to match exactly |
| Matching door threshold trims | Yes - available in either a standard lacquered finish or to match exactly |
| Matching thresholds and trims | Yes - available in either a standard lacquered finish or to match exactly |
| White 2400mm x 16mm x 16mm scotia beading | Yes |
| Warranty | |
| Warranty for residential use | 12 years - see warranty tab and terms and conditions |
| Warranty for commercial use | Yes, but contact us for details |
Staki 20mm x 220mm Oak Blanc LED-Oiled multi-layered floor
- Product Code: SLBL220L
- Availability: In Stock
-
£104.87 /m²
- exc VAT: £87.39 /m²
Related Products

Evo-Stik Sealant - White
A high quality white sealant suitable for interior and exterior use - and ideal for use with enginee..
£9.23 /each exc VAT: £7.69 /each

Barrier Plus Foam underlay
A standard polyethylene foam underlay with a built-in vapour barrier, ideal for all engineered floor..
£37.07 /roll exc VAT: £30.89 /roll

Duralay Timbermate Excel underlay
A standard polyethylene foam underlay with a built-in vapour barrier, ideal for all engineered floor..
£100.99 /roll exc VAT: £84.16 /roll

Quicktherm Vapour underlay
A very high-density 2mm thick premium polyethylene rubber underlay with a built-in moisture barrier ..
£59.30 /roll exc VAT: £49.41 /roll

Fibreboard underlay
A rigid, dense fibreboard underlay, made from natural fibres and ideal for all Holt and Staki engine..
£33.14 /pack exc VAT: £27.61 /pack

Polythene Moisture Barrier
A polyethylene vapour barrier for use on concrete sub-floors with any underlay that does not have a ..
£72.38 /roll exc VAT: £60.32 /roll

White Scotia Beading
A white scotia beading for the perfect finishing around your floor, ideal for all engineered floors!..
£4.50 /length exc VAT: £3.75 /length

Oak Radiator Pipe Covers
Solid oak radiator pipe covers, available either unfinished or in a standard UV satin-lacquered..
£10.36 /pair exc VAT: £8.64 /pair

Installation Kit
A comprehensive installation kit with all the bits you'll need to make your floor look as though it'..
£15.48 /each exc VAT: £12.90 /each

Oak Stair Nosing for 20mm Staki Multi-Layered Floors
A solid oak stair nosing for 20mm Staki multi-layered floors available in 900mm and 2700mm lengths a..
£21.28 /length exc VAT: £17.73 /length

Lecol PVAC Wood Adhesive
A general purpose flooring-grade PVAC wood adhesive, commonly used for floating floors.New clever bo..
£9.76 /each exc VAT: £8.13 /each

Oak Threshold Section for 20mm Multi-Layered Floors
A solid oak threshold section for 20mm multi-layered floors, available in 900mm and 2700mm lengths a..
£13.75 /length exc VAT: £11.46 /length

Oak Ramp Section for 20mm Multi-Layered Floors
A solid oak ramp section for 20mm multi-layered floors available in 900mm and 2700mm lengths an..
£17.08 /length exc VAT: £14.23 /length

Oak Semi-Ramp Section for 20mm Multi-Layered Floors
A solid oak semi-ramp section for 20mm multi-layered floors available in 900mm and 2700mm lengt..
£15.24 /length exc VAT: £12.70 /length

Oak End Section for 20mm Multi-Layered Floors
A solid oak end section for 20mm multi-layered floors available in 900mm and 2700mm lengths and eith..
£11.97 /length exc VAT: £9.97 /length

Oak Scotia Beading - 2700mm x 19mm x 19mm
A 2700mm x 19mm x 19mm solid oak scotia beading available unfinished, satin-lacquered, oiled, o..
£9.63 /length exc VAT: £8.03 /length

Oak skirting - 65mm x 2700mm x 20mm
A 2700mm x 65mm x 20m solid oak skirting board available unfinished, oiled, or as an exact match to ..
£36.50 /length exc VAT: £30.41 /length

Oak Square Stair Nosing for T&G 20mm Staki Multi-Layered Floors
A solid oak square stair nosing for T&G 20mm Staki multi-layered floors available in 900mm and 2..
£19.58 /each exc VAT: £16.32 /each

Oak Quadrant Beading - 2700mm x 19mm x 19mm
A 2700mm x 19mm x 19mm solid oak quadrant beading available unfinished, satin-lacquered, oiled,..
£13.26 /length exc VAT: £11.05 /length
Tags: Staki