


LiViT LVT is suitable for both residential and commercial areas such as shops, hotel rooms etc, and it's really simple to install!
A bit of planning, a bit of care and your floor will look as though it's been laid by a professional!
Before you start
LiViT LVT uses the latest i4F Drop-Lock technology for joining the boards together. Before reading the detailed bits below about installing a LiViT floor, have a look at this video to see how it's done. It will also give you some useful tips on other aspects of installation as well as showing you how to disassemble the boards should you ever have to do that.
Transport and storage
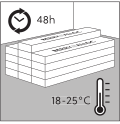
| The packs of flooring should be stored flat in their packaging in a pile no more than 5 packs high. Take care not to damage the locking edges of the planks when putting the floor down on the ground. Store the packs of flooring for at least 48 hours at room temperature (18-25°C) before installation. Make sure the packs are spaced out so they condition to the surroundings. This temperature should be maintained throughout the installation and for least 24 hours after installation. N.B. Your packs of flooring must be stored inside. |
Tools
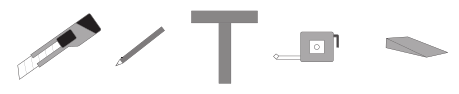
You will need a hard PVC mallet, Stanley knife, pencil, T-square, tape measure and spacers to give you the correct expansion/contraction gap around the edge of the floor. For installing skirting boards and door and edging profile, you will also need a power drill.

Subfloor
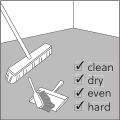
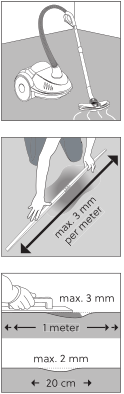
| Careful subfloor preparation is essential for an excellent result. A rough or uneven subfloor may show through your new floor resulting in an unsightly finish. it may also cause excessive wear on high spots, indentation on lower spots or damage to the locking system. Make sure you remove all traces of plaster, paint, glue, oil, grease, etc. Your subfloor must be clean, flat, dry and stable. Take up any textile floor coverings (such as carpet, needle felts, etc.) and remove all debris including nails. LiViT LVT can be installed on top of concrete, tiles, wood and most existing hard-surface floor coverings provided that the subfloor is smooth, dry and clean. It should not be installed on soft-surface floor coverings such as carpet or cushion vinyl. Although LiViT LVT is impervious to moisture, subfloors must be checked for any moisture problems as excessive moisture can generate mould or fungus. Depending on your subfloor, a moisture barrier might therefore be necessary. You should check to make sure your subfloor is level. A maximum deviation of 3 mm per metre, and 2 mm per 20 centimetres is acceptable but If these margins are exceeded, the subfloor must be evened out with a suitable filler or levelling compound, and a check should be carried out to determine if a sealer is needed. |
Subfloor preparation
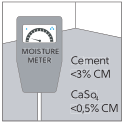
| Where you have a new concrete/screed subfloor, you must let it dry out sufficiently. The moisture content of the subfloor must be less than 75% RH at a minimum room temperature of 20°C (a maximum 2 % CM for cement and 0.5 % CM for anhydrite). Where there is underfloor heating, the moisture content should be less than 1.8 CM% for cement and 0.3 CM% for anhydrite. Always record and retain your moisture content results. Repair any surface imperfections with an appropriate repair compound and check if a primer or sealer is needed. Vacuum the subfloor afterwards to remove all debris. |
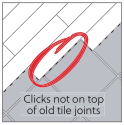
| When installing a LiViT LVT floor on a tiled subfloor, check the subfloor for any moisture problems Take care to ensure that the joints of a LiViT LVT floor are not directly over the underlying tile joint. It is not necessary to fill the grout lines between the tiles of a tiled subfloor if these do not exceed 6 mm in width. |
| Where you have a timber subfloor, check the floor for insect infestations and make sure the subfloor is level. Nail down any loose sections and any protruding nail heads. Timber subfloors should always have access to air and be properly ventilated. |

Before installing
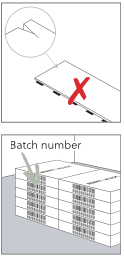
| LiViT LVT is not suitable for outdoor use or conservatories. Ensure that the indoor temperature is always kept above 5°C and ideally between 18 and 25°C. Avoid long-lasting exposure to direct sunlight. LiViT LVT should not be used in areas where drainage systems have been incorporated into the subfloor. Check all boards for any visible defects in optimal light conditions, both before and during installation. Boards with defects must not be used. Make sure that you mix panels from different boxes in order to minimize any shade variations. This will ensure a more natural looking floor. Always keep the production batch number which you'll find printed on the box, together with your order and invoice. When installing LiViT LVT tiles, use only a single production batch number for each installation. |
Underfloor heating
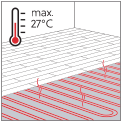
| Underfloor heating is fine provided that the floor temperature does not exceed 27°C. Only hot water or electric underfloor heating systems which are embedded in the subfloor floor are suitable. Heating films or other systems that are just placed on the screed or subfloor are not suitable. The surface construction of the heating system must be hard. Switch off or lower the underfloor heating to 15°C at least 48 hours before installation and keep it at that temperature during installation. 24 hours after installation, increase the temperature of the underfloor heating gradually by 5°C each day up to a maximum floor temperature of 27°C. Do not exceed 60W/m² with electrical underfloor heating systems. If for some reason you have to switch the underfloor heating off, you must carry out the above process in reverse. |
Underlay
LiViT LVT floors have the underlay already attached to the underside of the floor and can be laid directly onto your subfloor. No other underlay should therefore be necessary.
Installation
LiViT LVT is laid as a floating floor so there should be no adhesive used between the floor and the underlay or the subfloor. The floor will expand and contract slightly depending on the ambient conditions so you must allow the floor to move freely. You must therefore allow a gap around the edge of the room and any other fixed objects - e.g. radiator pipes, columns, door thresholds etc. Do not screw or nail it down to the subfloor. Exceptionally heavy furniture such as kitchen cabinets must not be installed on top of your floor as again this will prevent your floor from moving freely.
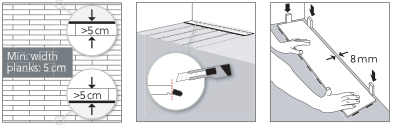
The first and last rows should not be less than 5 cm wide, so measure the room to create a balanced layout and you will then be able to see if the first row needs to be cut to width. If the first row of panels does not need to be trimmed in width, you must remove the tongue on the side of the board that faces the wall to allow for the correct expansion gap.
It is vitally important to leave an expansion gap around the edge of the room and around any radiator pipes, columns or door thresholds. This expansion gap should be at least 8mm on all sides and increase 1mm for every metre over 8 metres - e.g. if the room measures 15 metres x 15 metres, the expansion gap should be 15mm.
The expansion gap should be 15mm at the very most. If the room is any more than 15 metres, you must then use an expansion profile. Bear in mind when running the floor from one room to another through a doorway, to measure the total length of the run of the floor and if that exceeds 15 metres, you must use an expansion profile across the door.
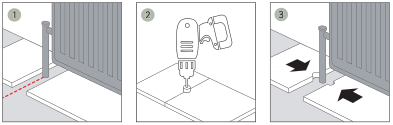
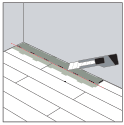
Don't forget to allow the same expansion gap around pipes and columns. The easiest way to drill the holes in the floor for radiator pipes is shown in the diagrams above. Line up the floor so that the header joint between two boards is in line with the pipe, join the boards together and mark where the hole should be. Drill the hole, take the boards apart and then slot them together around the pipe. You can then use a radiator pipe cover to cover up the expansion gap.
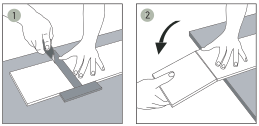
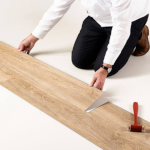
| To cut a board, measure where to cut it and then with the decor side up, use your T-square and Stanley knife to cut into the board. You will not cut all the way through so just snap it to get a clean cut as shown. |
| Step 1 - Connect the long side of the board at an angle to the boards in the previous row. |
| Step 2 - Slide the board along until the end joint of the board you're installing is directly over the end joint of the board you've just installed. |
| Step 3 - Push the board down so the joints on the two boards locate. You should hear a 'click' as they locate. |
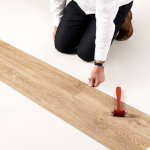
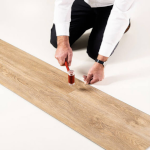
| Step 4 - Use a PVC mallet to tap the top of the end joints tight together. |
| To get the correct measurement of each board in the last row, place a new board exactly on top of a board in the previous row. Place another board upside down on top of it but this time tight up to the wall. Put a spacer between the wall and the upside-down board (not between the wall and the tongue of a board otherwise you will end up with an oversized expansion gap) and then using the other edge of the board as your guide, mark the board underneath (i.e. the loose board exactly on top of a board in the previous row). Cut the marked panel to size and then click it in place. This method should be repeated for each panel until the last row is complete. Alternatively you can just measure the gap between the wall and the penultimate row at the middle and both ends of a board, deduct the expansion gap of at least 8mm from your measurements, and then measuring from the tongue side, mark the measurements on the decor-side of the new board. Draw a line connecting all the measurement marks, cut the board along the line you've marked and then snap in two as shown in the video above. |
Installing planks

When installing planks, always ensure that the short end joints are staggered by a minimum of 30 cm when you start the next row. Use the left-over piece from the previous row as the first piece of the next row provided that this piece is at least 30 cm long.
Installing tiles

When installing tiles, always ensure that the short end joints are staggered by a minimum of 20 cm when you start the next row. Use the leftover piece from the previous row as the first piece of the next row, provided that this piece is at least 20 cm long. To get the correct tile effect on your floor, make sure that the end joints are staggered equidistantly from the end joints in the previous row.
Doorways
Doorways take a little bit of thought and planning ahead especially if you're planning to run the floor from one room to another through the doorway without a break.
Before you start laying your floor or at least before you get too close to the doorway, get an offcut of the floor and the underlay, put them up against the door jamb and then use a handsaw to undercut any architraves and door linings as shown in the diagrams below. Clear out any debris from underneath so the floor can move freely under the door frame once it's installed.
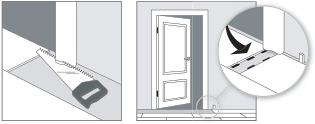
If you're planning to run the floor through the doorway without a break, you will need to cut the door linings and architraves all the way round both door jambs but if you're stopping at the doorway, just cut the linings as far as you're taking the floor.
You should now have a gap at the bottom of the door jamb which allows the floor to move freely underneath and which at the same time gives you the expansion gap, now hidden under the door lining.
Cut the boards to shape when you get to the doorway not forgetting to allow for the expansion gap wherever necessary, so that they fit under the door jamb. You may find it difficult to click the boards in place around a doorway so feel free to chisel off the lip of the groove of a board and use an adhesive to glue the boards together.
Use one of the Pure LVT aluminium threshold sections wherever the floor butts up to a different floor covering and don't forget to allow for the expansion gap.
Pure LVT aluminium threshold sections
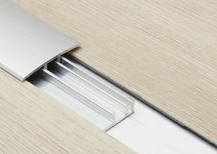
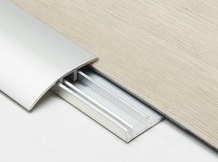
Have a look at the installation tabs on any of the Pure LVT aluminium 'T' section, ramp profile or end profile pages for instructions on how to fit them.
Finishing off
Once you've finished laying your floor, make sure you remove all the spacers you've used around the edge of the floor.
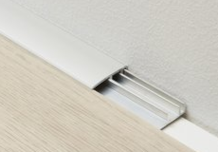
If you've removed your skirting boards at the outset and you're either refitting them or fitting new ones, make sure that the thickness of the skirting is more than enough to cover the expansion gap you've left. Remember that floors can contract as well as expand so make sure that your skirting is thick enough so that the expansion gap doesn't become visible at any time.
Where the existing skirting boards have been left in place and you've left the correct expansion gap between the skirting and the floor, you'll need the use a scotia beading to cover the gap.
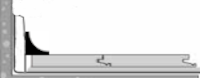
Have a look at the installation tab on the Pure LVT scotia beading page for instructions on how to fit the beading.
Do NOT under any circumstances pin or glue any skirting or beading to the floor itself. The floor must be allowed to move freely under the skirting and beading at all times.
That's it!
You should now have a floor that looks as though it's been installed by a professional!
Any problems, don't hesitate to get in touch!
Your LiViT LVT floor is really easy to look after!
A bit of care and it will look good for years to come!
Looking after your floor
Although your LiViT LVT floor is one of the easiest floors to maintain, please follow our recommendations below and that way you'll keep it looking fresh as well as protecting the factory finish. After installing your floor, give it an initial cleaning to get rid of any dirt or debris.
Do's
| Your floor's biggest enemy is grit and the smaller the grit, the worse it is. The first thing you must do therefore is to put an entrance mat inside every external door to encourage people to wipe their feet, and hopefully that will prevent any problems from arising. If possible, have one outside as well and also, don't forget to clean your mats every so often. Do not use of rubber-backed, foam or plastic-backed mats as they may discolour the floor. |

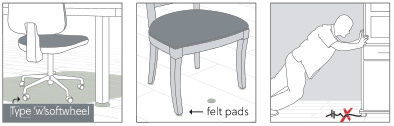
Use felt pads under furniture legs to stop any unforeseen scratching and put castor cups under the castors on chairs and sofas. Alternatively ensure that office chairs and fitness appliances etc are fitted with soft, non-rubber casters.
Use a suitable desk mat with a desk.
Always lift heavy furniture when you're moving it around the room.
Clean your floor regularly. Use a brush or vacuum cleaner first of all to get all the loose dirt off the floor and then use a mop to clean it. Use warm clean water and a mild, pH-neutral detergent or domestic floor cleaning emulsion. Rinse the mop regularly, mop up any residual water and then allow your floor to dry. We strongly recommend using Pure LVT Vinyl Planks cleaning products. Any other cleaning product may contain agents that damage resilient floor surfaces.
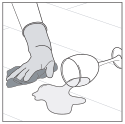
| Wipe up any spilled liquids as soon as possible. Your floor can feel more slippery when it becomes wet. Spots, marks and spillages should be wiped up as soon as possible. |
Keep the ambient temperature to 18 - 20°C whenever possible.
Relocate rugs from time to time to avoid an uneven appearance.
Don't's
Don't leave water or any other liquid lying around on your floor for any length of time.
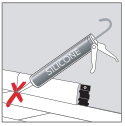
Never use wax, polish, vinegar, abrasive cleaners or scouring agents as they may damage the finish of your floor.
Never use a steam cleaner on your floor.
Don't let sharp or abrasive objects come into contact with your floor.
Don't slide heavy furniture across your floor.
Don't wear stilettos, especially ones with worn heels.
Avoid exposure to direct sunlight for prolonged periods of time and during peak sunlight hours, use drapes or blinds to minimise direct sunlight.
If your floor has been subjected to an excessive amount of water due to flooding, don't panic. Your floor is highly-resistant to water so it won't be damaged. Mop up the water as soon as possible and if necessary use a dehumidifier to dry out the room. If the water has got through to your sub-floor, take up the floor, dry and clean everything, and then re-install your floor. Do make sure however that the underlay attached to the floor is completely dried out and reusable.
General:
All LiViT LVT floors are guaranteed from the date of delivery for the period and under the conditions warranted by ourselves. If any goods are found to be defective during the guarantee period and providing such defects have not occurred through incorrect installation, usage or maintenance procedures, or through the liability of other products or persons, we will at our discretion either rectify or replace the defective part of the goods or refund a corresponding proportion of the original price in accordance with the manufacturer's warranty. All goods should be carefully checked for any visible defects both before and during installation. Any goods which are installed in spite of such defects are not covered by the guarantee. Under no circumstances shall we be liable for any consequential loss whatsoever in the event of any claim arising under a guarantee.
The terms of the LiViT LVT warranty are as follows:
Installation warranty:
LiViT LVT floors are guaranteed for the period set out in the specification tab for each individual floor. They are guaranteed for all residential and commercial installations to be free from defects caused as a direct result of faulty manufacture providing the floor is installed in accordance with the manufacturer's installation instructions, a copy of which can be found in each pack of flooring.
Visual appearance warranty:
LiViT LVT floors are carefully inspected by quality control personnel before leaving the factory. However, flooring should be carefully examined by the customer and the installer for any defects prior to installation. In the unlikely event of a defective board being found, it will be replaced free of charge. In the event that a defective board is installed whether inadvertently or deliberately, no warranty shall apply.
Structural warranty:
All LiViT LVT flooring is manufactured using a sophisticated bonding system with each board being produced under intense heat and pressure to ensure the highest level of quality. In the unlikely event of any structural failure of a board within one year of the installation of the floor, we will at our discretion either repair or replace the defective board free of charge. If failure occurs more than one year after installation but before the end of the warranty period, the liability under this warranty will decrease by 10% of the invoice value each year and will be limited to the repair replacement or refund (at our discretion) to the decreased value for that year.
Exclusions:
The warranties described above will not apply and we will not in anyway be liable in the event of:
- Improper installation - Performance of the floor is highly dependent upon proper installation. Installation must therefore be in strict accordance with the LiViT LVT installation instructions.
- Improper maintenance - Maintenance must be in strict accordance with LiViT LVT maintenance instructions.
- Abnormal environmental conditions - LiViT LVT flooring products are guaranteed to perform in what we consider to be normal residential and commercial applications. Any exposure to excessive heat or excessive moisture may cause damage to the flooring and is not covered by this warranty regardless of cause or source. Electric under-floor heating systems are able to supply an almost instantaneous heat to the floor which warms up the floor over a very short space of time. This can cause tensions within the floor. We cannot therefore guarantee a LiViT LVT floor which is laid over electric under-floor heating. Any damage caused by environmental conditions outside the tolerances specified in the LiViT LVT installation instructions is excluded from any or all of this warranty.
- Misuse - No responsibility will be accepted for any damage caused directly or indirectly through misuse, abuse, accident or use that is not consistent with the LiViT LVT installation instructions. No guarantee either express or implied is given for any damage due to inadequate care or other causes including without limitation, stains, damage caused by worn or narrow-heeled shoes, by the movement of furniture or equipment, by heavy items, by impact, by scratches or scarring caused by pets or other animals, by abrasive or sharp-pointed items, or by extreme heat..
- Alterations or repairs - Alterations and unauthorised repairs to any LiViT LVT flooring will void any and all express or implied warranties including merchantability or fitness for purpose. Any authorised repairs will not extend the guarantee period.
- Reinstallation - In the event that we replace defective boards, we shall not be liable to provide for or incur the costs of removing or reinstalling the defective floor or resurfacing or refinishing the replaced or surrounding floor or to provide for the cost thereof unless and to the extent expressly provided in the warranty description above. No liability to replace or repair shall extend to any other materials or any other items used in the course of removal, installation or refinishing.
- Normal variances - Exposure of all or parts of the installed flooring to direct sunlight may cause variations in colour and such variations are not covered by this warranty
This warranty is not transferable and is extended only to the original purchaser and for the original installation. All warranties shall expire on sale, transfer or relocation of all or any part of the installed floor.
Liability limitations:
The above warranty is the only warranty either express or implied provided by ourselves for residential and commercial applications. Except as stated herein no other warranty, express or implied, is provided including any warranty of fitness for a particular purpose. No retailer, installer, dealer, distributor, agent or employee has authority to increase the scope or alter the terms or the coverage of this warranty. No agreement to repair or replace shall in any event act to extend the period of coverage of any warranty provided. In no event shall we be liable for any claim loss or damage arising from the purchase, use or the inability to use its products or from any form of special, indirect, incidental, or consequential damages including, without limitation, lost profits, emotional, multiple, punitive or exemplary damages, or legal fees. In no event shall we be liable for the costs of old or new materials other than LiViT LVT floors. In no event shall our liability exceed the amount we actually received for the sale of the defective materials concerned. Any claim under the terms of this warranty must be made within seven days of the date on which the defects first became known or first should have been discovered. All claims must be in writing and in order to make a claim under this warranty, evidence of the purchase date and the identity of the original purchaser and installation location must be provided. Without such proof, no warranty shall apply.
Slate floors are renowned for being tough and extremely hard-wearing and this dark grey, almost black, slate 'click' vinyl floor doesn't disappoint in either toughness or looks, so - put your room on the slate for a fraction of the price of the real thing and give it the 'wow' factor!
This dark grey almost black slate floor is a superbly cost-effective floor, especially compared to real slate. It's so easy to install what with the underlay already attached. Hard-wearing and durable, and so easy to maintain, the silence, the warmth, the comfort that this floor brings to a room, will simply astound you. Cleverly engineered to provide strength and stability and laid as a floating floor so that there's no need for any bonding to your subfloor, its interlocking edges enable anyone to lay this floor absolutely perfectly every single time, just like a professional would!

Key features:
- £69.15 per pack including VAT - £57.63 per pack excluding VAT
- 607mm x 303mm x 5mm board
- 12 boards in a pack = 2.21 square metres coverage
- Laid as a floating floor so no need for any adhesive
- IXPE foam underlay already attached
- Suitable for heavy domestic use (AC23) and general commercial use (AC32)
- 10 year guarantee for domestic use
- 5 year guarantee for commercial use
- Really easy to install - the boards simply click together
- So easy to maintain
- Suitable for use with under-floor heating
- Suitable for use in wet areas but not in conservatories/sunrooms
- See below for all accessories available with this floor
| Board specification | |
| i4F Drop-Lock interlocking joint | Yes |
| Flush-finish edges | Yes |
| Surface | Textured matt surface |
| Wear layer | 0.3mm |
| Coreboard | Stable rigid board |
| Board size | |
| Board size | 607mm x 303mm |
| Board thickness | 5mm |
| Pack size | |
| Boards per pack | 12 |
| Area per pack | 2.21 square metres |
| Pack weight | 12.5kg |
| Installation | |
| Floating floor | Yes |
| Interlocking joint | Yes |
| Underlay required | No - underlay is already attached |
| Suitable for use with under-floor heating | Yes - but see installation instructions for further details |
| Finishing items | |
| Matching thresholds and trims | No |
| White 2440mm x 15mm x 15mm scotia beading | Yes |
| Technical | |
| Wear class for domestic use | AC23 |
| Wear class for commercial use | AC32 |
| Warranty | |
| Warranty for residential use | 10 year warranty - see warranty tab and terms and conditions |
| Warranty for commercial use | 5 years - see warranty tab and terms and conditions |
LiViT LVT LT32 Vermont Slate vinyl floor
- Product Code: LT32
- Availability: In Stock
-
£31.29 /m²
- exc VAT: £26.08 /m²
Related Products

Radiator Pipe Covers
Radiator pipe covers in a stainless steel finish for that final touch! Yet another product to g..
£13.29 /pair exc VAT: £11.07 /pair

Pure LVT Aluminium 'T' Section
Looking to join two Pure LVT vinyl floors together, for instance at a doorway. Look no further!An al..
£54.56 /length exc VAT: £45.47 /length

Pure LVT Aluminium Ramp Section
An aluminium ramp section, available in bronze, champagne and silver. The perfect finish betwee..
£54.56 /length exc VAT: £45.47 /length

Pure LVT Aluminium End Section
An aluminium end section, available in bronze, champagne and silver. The perfect finish for you..
£54.56 /length exc VAT: £45.47 /length

White Scotia Beading
A white scotia beading for the perfect finishing around your floor, ideal for all Pure LVT floors!Si..
£4.50 /length exc VAT: £3.75 /length

Pure LVT Vinyl Plank Cleaner
The ideal cleaner for maintaining your Pure LVT floor. Keeps your floor looking as good as new!Just ..
£25.60 /each exc VAT: £21.33 /each

Pure LVT Vinyl PU Protect
A polyurethane polymer dispersion for the initial protection of your floor which can be used for a q..
£34.08 /each exc VAT: £28.40 /each
Tags: LVT